
Anaconda: The crème de la crème of Python distros
Summary
In this post I will briefly talk about a beautiful all-in-one Python distro, Anaconda, and how to use it to create two virtual environments with Python 2.7 and Python 3.4 for all your Pythonistic needs.
The Past
For years, I was a hardcore advocate of the Enthought Python Distribution (EPD) but ever since Enthought decided to migrate things to Enthought Canopy, I’ve found myself yearning a less… commercial, i.e. free, solution. Don’t get me wrong the EPD was a god-send for those who didn’t want to spend hours trying to get libraries like NumPy and SciPy onto their Windows boxes but I just found Canopy to be heavy, clunky, and altogether unnecessary. Enough bashing however, what doesn’t work for some works for others and vice-versa.
The Present and, hopefully, the Future
Some time ago however, I stumbled across Anaconda by Continuum Analytics which answered all my Pythonistic needs.
In a nutshell, the foremost perks of this distro are:
- Anaconda is based on the conda package manager which IMHO is the best package manager to ever hit the Python scene. Don’t take my word for but if Travis Oliphant says so then just jump on the bandwagon.
- Not only does conda access repos with a lot of the nastier (to install) Python packages, e.g. NumPy, SciPy, VTK, etc., but it makes creating virtual environments and installing whatever packages you want in them a breeze.
- I shouldn’t have to say it but yes! It is freer than the air you breathe (there’s taxes and junk on that)!
- Not only is the ‘basic version’ free which means it contains pretty much everything you would most likely need, but the good ol’ folks at Continuum have created a lil’ addon called Anaconda Accelerate which… well let me just quote what it does: “Accelerate includes two packages that can be added to your Python installation: NumbaPro and MKL Optimizations. MKL Optimizations makes linear algebra, random number generation, Fourier transforms, and many other operations run faster and in parallel. NumbaPro builds fast GPU and multi-core machine code from easy-to-read Python and NumPy code with a Python-to-GPU compiler.”. If you are an academic then you’re in luck cause they actually give Accelerate for free to most academic institutions. I mean, how AWESOME IT THAT?!
Personally, the ability to install all those nasty packages was what sold me. I mean, if I want to spend hours battling with esoteric package compilations then I’ll go back to C++ thank you very much. Python is supposed to be about high-productivity-minimal-nonsense coding.
Creating the Environments
So if by this point somehow I’ve convinced you to go for Anaconda you’ll find yourself wanting me to make good on my promise about helping you set up two virtual environments containing Python 2.7 and Python 3.4.
Now I am NOT going to join the holy war over whether you should migrate to Python 3 or not or rehash any of the arguments. Personally, I believe we will all have to eventually move onto Python 3 but for the time being Python 2 has the larger code-base. Period. Thus, its useful to have both on your system and be able to easily switch between them as needs and situations warrant.
After the Anaconda installation completes, open a command-prompt or terminal (I recommend iTerm2 for Mac and ConsoleZ, PyCMD or, if you can afford it, TakeCommand for Windows.
Enter conda info -e. The conda info command gives basic information on your Anaconda installation. The -e flag provides info regarding the environments you have on your machine. The output should look something like the figure below.
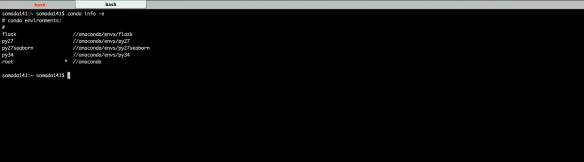
Naturally, in your system you should only be able to see the root environment but that’s about to change. Lets first create a Python 2.7 environment with the following command:
conda create -n py27 python=2.7 anaconda
What this command does is create and environment named py27 with an Anaconda distro of Python 2.7. Allow conda to perform all necessary changes and keep in mind that it will most likely download a truckload of packages so be patient.
Upon completion you can now enter the next command:
conda create -n py34 python=3.4 anaconda
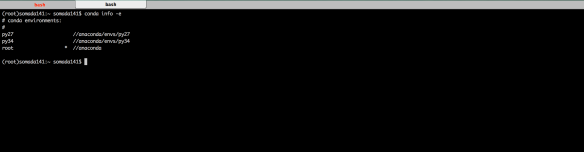
Which, similarly to above, will create a Python 3.4 environment named py34. Upon completion, re-running conda info -e should give you an output similar to the one in the figure below.
Switching between Environments
At this point the two additional environments should have been created and all should be well with the world. In order to enable or ‘activate’ these environments, you need to use the source activate (on Mac) or activate (on Windows) commands.
By default, the root environment would be the one active in any new session (which you can of course check through conda info -e). By entering source activate (on Mac) followed by the name of the environment you want to enable, e.g., source activate py27 or activate py27, you will be able to switch to that environment.
You can find a lot more info on how to use conda under here and there’s a wealth of information around on how to install and use Anaconda (or its minimalistic version Miniconda) on any of its supported platforms including CI systems like Travis CI).
Thanks for reading!

Pingback: Interactive Plotting in IPython Notebook (Part 1/2): Bokeh | PyScience
Pingback: IPython Notebook & VTK | PyScience
Pingback: Surface Extraction: Creating a mesh from pixel-data using Python and VTK | PyScience
Pingback: Ray Casting with Python and VTK: Intersecting lines/rays with surface meshes | PyScience
Pingback: From Ray Casting to Ray Tracing with Python and VTK | PyScience
Pingback: Image Segmentation with Python and SimpleITK | PyScience
Pingback: Volume Rendering with Python and VTK | PyScience
Hi!
Thanks for your nice posts, this blog is really helpful for beginners. I have followed your instructions here to create both py27 and py34 envs. Then I have tried to install simpleITK both with the instructions of your post, and by means of binstar:
conda install -c https://conda.binstar.org/simpleitk simpleitk
(with the py27 env activated) Unfortunately, although the installation seems to go smoothly, I keep getting import failure of simpleitk. I am using also pycharm, and I set the Prohect Interpreter to be the one of Anaconda. Do you have any clue of what I am doing wrong? Maybe I should tell also pycharm to use the virutal environment py27? Currently, the interpreter it seems to be using is ~/anaconda/bin/python.
I am new to ubuntu, pycharm and anaconda, everything is freshly installed but I am not a big expert :S . Any help will be welcome.
Many thanks for your blog!
LikeLike
Hey Adrian, thanks for the kind words. First of all does the import fail in the terminal upon import, i.e., when you write ‘import simpleitk’ does it go through?
LikeLike
As for PyCharm you do have to point it to the python interpreter executable for the particular environment which will be under ‘envs/py27/bin/python’ or something like that. However, if SimpleITK doesn’t import in the command line then the issue is irrelevant to PyCharm
LikeLike
Hi,
Thanks for the quick response! In fact, it was a matter of making PyCharm point to the virtual environment, using the ‘Add Local’ feature in the Project Interpreter section. Finally I managed to find the virtual environment, it was not under ‘anaconda/envs/py27’, as one would expect, but rather in a location called ‘~/.conda/envs/py27/bin’. As it was a hidden folder, I had not seen it.
I hope this will help anybody else with the same newbie troubles 🙂 In the following days, I will be following several of your tutorials on DICOM, vtk, simpleitk, etc. It’s nice to know you answer so quickly to this kind of issues. Again, many thanks for your effort!
Cheers,
Adrian
LikeLike
Haha no prob. Adrian. I’m glad it worked for you cause SimpleITK is a rather capricious package. Feel free to toss a comment when you run into trouble again 🙂
Cheers,
Adam
LikeLike
Hi,
Thanks so much for taking the pain and writing about VTK and Python. Such help is much needed. Interestingly, I am happy to know that I am not the only person who switched from EPD to Anaconda after Enthought brought Canopy into the mix.
You have got yourself another follower to your blog 🙂
Cheers,
Indranil.
LikeLike
Thanks Indranil, I’m glad to hear more people made the switch after Canopy. Don’t get me wrong I’m eternally grateful for EPD (especially since I used to develop on Windows for my last job where installing VTK or even NumPy was a pain) but Canopy seemed like the kinda thing you release when you want more Windows users (with their GUI, and package managers) :D. IMHO Anaconda has won the war with developers but Canopy is still a good entry-level tool for people just getting into it.
I feel supremely ashamed I haven’t managed to put more time into new posts, its not like I’ve already explained all the esoteric functionality VTK has to offer, but each of those pesky posts takes days and I just haven’t had the luxury yet :). Might just post a poll and ask people what they’re having trouble with (if you have any specific issues shoot). Stay tuned though and thanks for reading 🙂
Cheers,
Adam
LikeLiked by 1 person
I agree with you. Regarding EPD, I have always loved EPD. In fact, I have recommended EPD to so many people in the past. I am an Windows user myself, but I liked the freedom to use whatever editor/ shell / notebook and however I wanted using EPD. Canopy seems a little restrictive for me (I feel locked up in a room), although you can use all that I mentioned earlier (through canopy). I wished Enthought provided both EPD and Canopy, and that it had not killed EPD. I am actually very grateful to Enthought for EDP (in the past), and the excellent training material (available for free to students), which I highly recommend to people trying to get started in scientific computing using Python.
Regarding the VTK (and other material at your blog) … well, I realized that it took a great deal of effort and dedication to create. I will look forward for more 🙂 I don’t have anything specific in mind right now … as I haven’t directly used VTK in my work (although I would like to get started sometime soon). I have been using Mayavi for generating 3D visualizations. I would like to use VTK directly using Python, but right now I don’t have any spare time to learn VTK all by myself. This is where I think your excellent material on VTK is going to help me get started and understand VTK quickly. So thank you very much for that.
Best regards,
Indranil.
LikeLike
You can actually download MKL versions of numpy and scipy to install. I’ve never understood the logic of companies behind Canopy and Anaconda with the charge for MKL nonsense when they are free. http://www.lfd.uci.edu/~gohlke/pythonlibs/#numpy
LikeLike
Well to be honest I’ve never looked too much into the MKL versions of those packages so thank you for the link 🙂 The primary perk in using Python distributions like the aforementioned ones is that they make it really easy to setup, update and reproduce your development environment which is a big hassle unless you’re using Linux
LikeLike
Find MKL versions for free at http://www.lfd.uci.edu/~gohlke/pythonlibs/#numpy
LikeLike
Hi Adamos
Thanks for your post, which I just found after searching Google for DICOM + Python.
I am a Python developer for over 10 years now, but somehow I never recognized Anaconda or realized that there are other things around besides Virtualenv/easy_install/pip.
The installation of the `py27` environment worked like a charm and I realized a fancy `Navigator.app` inside this py27 environment folder.
Everything looks quite promising and I will definitely play a little bit around with it.
Btw.: I’m new to the whole medical imaging topic and will definitely read the rest of your blog posts. Do you have any experiences with interfacing such systems with a JSON API? (Just asking because I saw `flask` in the screenshot above…).
Have a nice day and thanks again for sharing
Bests
Ramon
LikeLike
Hi Ramon, happy you liked the post, Anaconda really does make one’s life easier, especially when one’s not working in a linux environment. `pip` and `virtualenv` are lovely as long as one’s working with largely-pythonic packages that don’t have a truckload of fortran/c/c++ dependencies under the hood (which are just ‘uncompilable’ on Windows) 🙂
Now for APIs. Generally speaking medical image segmentation and processing codebases aren’t fast enough to do anything useful within the context of a single HTTP request. Sure, it can be done, you can POST a bunch of images and get back a compressed labelfield or something akin to that. That being said, I wouldn’t code it as such. Instead I would make an API that receive a processing request (with the data retrieved either through post or from AWS S3 or something), give back a job ID the caller can poll for completion, and eventually respond with a URL to the generated datasets within a JSON response along with job metadata and stats.
Don’t think I’d have the nerve to make a web-based interactive medical-image-processing tool that will render visualisations (although it can be done, e.g., WebGL, ParaviewWeb, VtkWeb etc)
LikeLike
Hi Adamos
Thanks for your detailed and fast reply.
I thought more of an interface to a PACS Server like e.g. DCM4CHEE (http://www.dcm4che.org) to fetch or create datasets through JSON requests.
As I said, I’m new to this topic and just at the beginning of my research, but at least I have experiences creating JSON interfaces for web based systems:
😉 (https://github.com/collective/plone.jsonapi.routes).
I have seen FHIR (https://www.hl7.org/fhir/json.html), which seems to describe some kind of a standard representation for such an interface, but I did not find any implementations yet (at least not for DCM4CHEE). I would like to use something like this instead of HL7, which looks kind of scary to me…
Anyhow, I think my comment is getting slightly off-topic regarding the contents of this blog post:) Feel free to contact me via email, would be nice to stay in touch.
Bests
Ramon
LikeLike
Haha I would’ve liked to have pretended to understand what you just said, nod thoughtfully, and remark ‘indeed’, but the above just went entirely over my head :D. I’m afraid I have absolutely 0-idea on what the ‘canonical’ way to represent that data would be in an API (short of throwing compressed binaries around).
Feel free to toss me an email if you need some help with the processing bit 🙂
LikeLike