IPython Notebook & VTK
Summary
This post will show the only, currently available, way to integrate those beautiful renderings you might create with VTK into an IPython Notebook by means of off-screen-rendering.
The Visualization Toolkit (VTK)
What & Why
If you haven’t heard of the Visualization Toolkit (VTK) before, then chances are that either you’re not into image processing and visualization, or that you’ve been on Mars for the last decade, in a cave, with yours eyes shut (yes, its a Simpsons quote, don’t you judge me 🙂 ).
For you see, while I’m as strong an advocate of Python as can be (if it was possible to marry a programming language I would have), there are certain tasks that just can’t be done effectively or efficiently in Python. Sure, you can do your simpler plots in Matplotlib, Seaborn, or even Bokeh and Plotly (on which I just wrote two posts here and here respectively). Sure, you can try and extract a mesh-surface from a dataset with the marching-cubes implementation in scikit-image or interpolate gargantuan 3D arrays with the routines in SciPy (good luck by the way). At the end of the day, however, the routines in VTK are way faster, more flexible, and have been tested with enormous datasets.
It’s not just happenstance that VTK is the core-component in invaluable, albeit as clunky as VTK itself, applications such as ParaView, VolView, Osirix, and 3D Slicer. The thing just works!
Now don’t get me wrong, I hate VTK! I find it overly convoluted, extremely poorly documented (talk about the steepest of learning curves), and the simplest of tasks requires 10 times the code and effort you would have in Python (as is the case with anything in C++). However, the functionality it provides can’t be found elsewhere and at least the Kitware folk were kind enough to provide a very extensive set of Python bindings.
If you’ve followed my advice in the first post about Anaconda, then you should already have VTK in your Python distro or you can simply install it through
conda install vtk. If not, then at least I hope you’re using EPD , Canopy, or some distro where VTK has been pre-compiled. Otherwise, good luck with that 🙂
Lack of Integration with IPython Notebook
To make things worse, if you’re a IPython Notebook fanatic such as myself, you’re in for a let-down. VTK doesn’t come with an HTML output option that would allow you to directly embed the rendering results into a notebook, or any other web-application for that matter. Obviously, being able to interactively pan/rotate/zoom the 3D scene from within the notebook isn’t possible either.
While, some notable effort is being invested in making the above possible, e.g., there’s a lot of buzz around ParaViewWeb and the X Toolkit (XTK) but more on this in a later post, I haven’t managed to find a simple out-of-the-box solution thus far.
Till something like that becomes available, and I strongly believe it will be sometime soon(ish), forcing an off-screen rendering and pushing an image of that render into the notebook is the only viable pain-free approach I’ve come across. This is what I’ll be showing here.
Embedding VTK Renders in IPython Notebook
Disclaimer: The code I’ll be giving in this section is not mine. I’ve come across this solution in the form of a ‘gist’ here , while a snippet of this code can also be found here. However, as these might be pulled down one day, I wanted to outline that code, explain how it works, and be able to refer to it in subsequent posts that will be dealing with VTK.
The function we’ll be using is the following:
import vtk
from IPython.display import Image
def vtk_show(renderer, width=400, height=300):
    """
    Takes vtkRenderer instance and returns an IPython Image with the rendering.
    """
    renderWindow = vtk.vtkRenderWindow()
    renderWindow.SetOffScreenRendering(1)
    renderWindow.AddRenderer(renderer)
    renderWindow.SetSize(width, height)
    renderWindow.Render()

    windowToImageFilter = vtk.vtkWindowToImageFilter()
    windowToImageFilter.SetInput(renderWindow)
    windowToImageFilter.Update()

    writer = vtk.vtkPNGWriter()
    writer.SetWriteToMemory(1)
    writer.SetInputConnection(windowToImageFilter.GetOutputPort())
    writer.Write()
    data = str(buffer(writer.GetResult()))

    return Image(data)
As you can see the vtk_show function takes three parameters: a vtkRenderer instance which contains what you want to render, and the width and height of the resulting rendering.
Now, lets examine the different parts of the above code:
    renderWindow = vtk.vtkRenderWindow()
    renderWindow.SetOffScreenRendering(1)
    renderWindow.AddRenderer(renderer)
    renderWindow.SetSize(width, height)
    renderWindow.Render()
What this part does is create a new vtkRenderWindow, enable off-screen rendering, and adds the vtkRenderer instance to it before setting the dimensions, and performing the rendering operation.
Note that the
Rendermethod above will actually create a window separate to the browser where your IPython Notebook currently is. Do not mess with it or close it cause you will most likely get a crash.
    windowToImageFilter = vtk.vtkWindowToImageFilter()
    windowToImageFilter.SetInput(renderWindow)
    windowToImageFilter.Update()
The above part creates a new ‘vtkWindowToImageFilter’ object which allows us to read the data in a vtkWindow and use it as input to the imaging pipeline. It then adds renderWindow to it and updates it.
    writer = vtk.vtkPNGWriter()
    writer.SetWriteToMemory(1)
    writer.SetInputConnection(windowToImageFilter.GetOutputPort())
    writer.Write()
    data = str(buffer(writer.GetResult()))

    return Image(data)
Lastly, a new vtkPNGWriter is created allowing us to create a PNG image out of the vtkWindow rendering. Note that we enable SetWriteToMemory since we don’t just want a PNG file to be created bur rather to embed that image-data into the IPython Notebook. Subsequently, we establish a ‘connection’ between the output of the ‘vtkWindowToImageFilter’ and the ‘vtkPNGWriter’ by means of the SetInputConnection and GetOutputPort methods, a very typical mechanism in VTK. After using Write to create the image, we take that data, push in a Python buffer, and convert it to a string. Lastly, we use the Image class from the IPython.display module, imported outside the function, to convert that data to an actual image which can be directly embedded into the IPython Notebook.
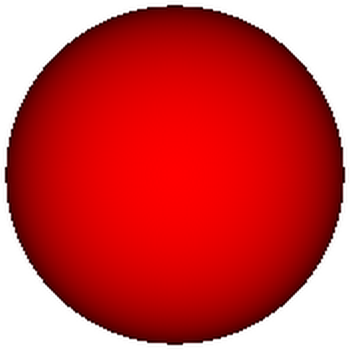
Example: The Red Ball
Now lets give a quick example, to showcase the function we just presented. In the interest of consistency, I stole and modified this example from the original author of this function :). You can see more examples in that gist here.
The following code creates a red sphere and uses the vtk_show function shown in the Embedding VTK Renders in IPython Notebook section to display the output within the IPython Notebook:
VtkSourceSphere = vtk.vtkSphereSource()
VtkSourceSphere.SetCenter(0.0, 0.0, 0.0)
VtkSourceSphere.SetRadius(10.0)
VtkSourceSphere.SetPhiResolution(360)
VtkSourceSphere.SetThetaResolution(360)

VtkMapperSphere = vtk.vtkPolyDataMapper()
VtkMapperSphere.SetInputConnection(VtkSourceSphere.GetOutputPort())

VtkActorSphere = vtk.vtkActor()
VtkActorSphere.SetMapper(VtkMapperSphere)
VtkActorSphere.GetProperty().SetColor(1.0, 0.0, 0.0)

VtkRenderer = vtk.vtkRenderer()
VtkRenderer.SetBackground(1.0, 1.0, 1.0)
VtkRenderer.AddActor(VtkActorSphere)

vtk_show(VtkRenderer)
Now let us examine the code piece-by-piece:
VtkSourceSphere = vtk.vtkSphereSource()
VtkSourceSphere.SetCenter(0.0, 0.0, 0.0)
VtkSourceSphere.SetRadius(10.0)
VtkSourceSphere.SetPhiResolution(360)
VtkSourceSphere.SetThetaResolution(360)
The above code-block creates an vtkSphereSource object which creates a sphere represented by polygons. We use the SetCenter and SetRadius to set the coordinates of the center to the (0, 0, 0) origin of the cartesian system and set the radius of the sphere to 10.0. The SetThetaResolution and SetPhiResolution methods set the number of points in the longitude and latitude directions respectively. A low ‘resolution’ results in the sphere looking polygonal. You can find the docs on this class here but be warned: the VTK docs are no more than an API reference.
VtkMapperSphere = vtk.vtkPolyDataMapper()
VtkMapperSphere.SetInputConnection(VtkSourceSphere.GetOutputPort())
Consequently, we create a new vtkPolyDataMapper (docs here) which maps polygonal data, such as the data representing the sphere, to graphics primitives. We then use the same SetInputConnection and GetOutputPort pipeline mechanism we saw in the previous section.
VtkActorSphere = vtk.vtkActor()
VtkActorSphere.SetMapper(VtkMapperSphere)
VtkActorSphere.GetProperty().SetColor(1.0, 0.0, 0.0)
Next, we create a new vtkActor (docs here) which is used to represent an entity in a rendering scene. We assign the newly created vtkMapper using the SetMapper method in order to link the sphere with this new actor. Remember how I said that VTK is overly convoluted? Well while understanding and utilizing the pipeline is the bane of my VTK dealings, once you start getting into it you’ll realize its well-justified. Lastly, we grab an instance of the actor’s properties through GetProperty and set the RGB color to red (utilizing a 0.0 to 1.0 range).
VtkRenderer = vtk.vtkRenderer()
VtkRenderer.SetBackground(1.0, 1.0, 1.0)
VtkRenderer.AddActor(VtkActorSphere)
We’re almost there, we merely create a new vtkRenderer object (docs here), set the rendering background color to white using the SetBackground method, and add the sphere actor we just created.
Lastly, remember how our vtk_show function needs a vtkRenderer instance to function? Well now we have it so all we need to do is call that function as such vtk_show(VtkRenderer). We could define the width and height of the rendering through a call like vtk_show(VtkRenderer, width=100, height=200) but we won’t bother. Upon execution you should get an image akin to the one in the figure below.
You can find an IPython Notebook with the code shown here under this link. Note that since we’re embedding the resulting render as an IPython.display.Image object, the image should be viewable on the nbviewer which makes it great for portability.
Resources
If you want to learn more about VTK then you could try and procure the book or take a look at small number of external resources. Special mention should go to this free book titled ‘Introduction to Programming for Image Analysis with VTK’. Keep in mind though that the majority of books and examples available out there provide code in Tcl script (who still uses that thing?) and C++ so you’re in for some translating if you’re using Python.
Otherwise, feel free to check back here cause I will be be providing more material in VTK which you might find useful :).
That’s about it folks, thank you for reading, and I hope you gained something from this 2000-word rant.

Pingback: NumPy to VTK: Converting your NumPy arrays to VTK arrays and files | PyScience
Pingback: Surface Extraction: Creating a mesh from pixel-data using Python and VTK | PyScience
Pingback: Ray Casting with Python and VTK: Intersecting lines/rays with surface meshes | PyScience
Pingback: From Ray Casting to Ray Tracing with Python and VTK | PyScience
Pingback: Image Segmentation with Python and SimpleITK | PyScience
Pingback: Multi-Modal Image Segmentation with Python & SimpleITK | PyScience
Pingback: Volume Rendering with Python and VTK | PyScience
I am using python tools for Visual studio as I don’t want to use IPython notebook.Can you tell me the steps to get the output? After running this code,I am not getting any output.
LikeLike
Well of course you’re not gonna get any output if you run this outside of IPython Notebook mate :). I mean VTK is set to ‘SetOffScreenRendering’ so rendering is windowless and stays in memory :). You’d have to render in the ‘traditional’ way as this whole post and code was meant for IPython Notebook.
Can you try running the code under this link: http://www.vtk.org/Wiki/VTK/Examples/Python/GeometricObjects/Display/Cone
That should work. Otherwise I’m afraid I have 0 experience with Visual Studio’s python tools 😦
LikeLike
Hi sir,i am using vtkbmpreader to read images,how can i get image height and image width in vtkbmpreader
LikeLike
Hi there,
keep in mind that the vtkBMPReader can only read .bmp files up to a depth of 24bit so if you’re using 32bit depth images it won’t read them.
With the above in mind you just read the image ‘image.bmp’ as such:
import vtk
reader = vtk.vtkBMPReader()
reader.SetFileName(“image.bmp”)
reader.Update()
and following a successful read you get the vtkImageData object out as such:
img = reader.GetOutput()
then you can simply use the ‘GetDimensions’ method of the vtkImageData class and get the dimensions thusly:
dims = img.GetDimensions()
LikeLike
Do you know what to do if we have a interactive window and we want to change the camera angle and take another picture?
LikeLike
Hi Leslie. The way I render VTK scenes in the IPython Notebook does not allow for interactive windows within the notebook (at least not in any straightforward manner). However, the last cell in this notebook of mine (http://nbviewer.jupyter.org/urls/bitbucket.org/somada141/pyscience/raw/master/20140917_RayTracing/Material/PythonRayTracingEarthSun.ipynb) shows how to create a separate interactive window.
LikeLike
when i am running this code, vtk_show(vtkRenderer) says buffer not defined so there is no display. kindly suggest
LikeLike
Have you made sure you’re running the right versions? The code was written on Python2.7 I believe VTK5
LikeLiked by 1 person
thanks. it worked with vtk 6.3.
LikeLike
Awesome 🙂
LikeLike
hi, I am doing with segmentation and 3D visualization on kidney CT, I have already segmented the kidney can combine all the slices to a 3d numpy arrary, and now I would like to use the marching cube in vtk for surface reconstruction, how could I use the manner in your article, I mean is there any way converting a 3d numpy array to a vtk file? thank you
LikeLike
It is entirely possible though the way to do it has changed over the VTK versions. I was gonna write a post on it some time ago but never got around to it. You can access the notebook under https://bitbucket.org/somada141/pyscience/raw/95f7b8e31af8029d10ee16becc582b317eaf5557/20150215_ConvertSimpleITKtoVTK/_Material/ConvertSimpleITKtoVTK.ipynb which should get you some of the way there
LikeLike
Hi, I have been glued to your posts and other references. Although it is alot to take as i am new to programming, python especially, I guess this question might be too basic but I’ll appreciate any help. So I am trying to determine the max and min thicknesses of stl files using raycasting (still researching other efficient methods), after which I plan to determine printability of those files with a 3D printer (although I am currently studying the on-screen software you referenced here and I’m also going through this blog and your other blogs, is there any other method you would suggest or other references you feel might help? down the line I plan to come up with a system that would analyse stl files and determine if it is printable considering wall thickness, water-tightness, etc. All help will be appreciated.
LikeLike
Hey Demola. Printability eh? I definitely wouldn’t call that basic. My experience with 3D printing is fairly basic so I’m not sure I can help much but from what I’ve seen STL files are used to calculate those weird path files that are then used to print.
Do you reckon that the evaluation of printability should be performed on the STL rather than those derived models?
The best I can think of is voxelization using the maximum resolution/minimum voxel size the intended printer can handle. Transforming to a voxel model should make it much easier to detect and fill holes as well as detect weak areas in the structure.
It’s been forever since I’ve looked into voxelization but here’s a couple links:
http://www.vtkjournal.org/browse/publication/792
https://www.vtk.org/doc/nightly/html/classvtkVoxelModeller.html
An old colleague of mine wrote the voxeler for SEMCAD (https://www.speag.com/products/semcad/solutions/). His thesis can be found under https://www.research-collection.ethz.ch/bitstream/handle/20.500.11850/7936/eth-29671-02.pdf?sequence=2&isAllowed=y and I believe one of the chapters is dedicated to voxelization.
Hope this helps 🙂
LikeLike
Thanks for your response. What I’m looking at is something that would be for general printers. For example, something similar to what shapeways does, where you upload your files to print and if there are issues with the file, those reports are generated for the user. We receive alot of designs from students and sometimes it’s pretty difficult making them realise why certain things won’t be printed or if printed, it will be of low quality as a result of their designs. I realised they “respect” computers interacting with them directly, so if they upload a job to be printed and the AI tells them, “John this won’t print because your wall thickness is too small” for example, so as the first step in what I’m trying to build, I need to be able to figure out the thicknesses of files submitted, understanding that some models with have several thicknesses on one particular model and same thing can be applied to several other models. Then after this, I can move onto the next step. So at first i thought raycasting (either onscreen or not) would do, and that would also give some more details about the files (say, I pass several rays of light across the model and that gives different thicknesses and dimensions at different points of “through” intersection, I can then easily determine the max and min thicknesses from these). I’m sorry for the long epistle, I’m just trying to get more help. Down the line, I hope to finalize this and make it accessible to the public as well but I am way behind my plans.
If I can’t do this with python and vtk, I don’t mind learning other languages or software to get this done
LikeLike
Hi Demola. I believe I get what you’re trying to do. Should be feasible with VTK which you can use either from C++ or Python. Dunno about other languages but I wouldn’t be surprised if there was a JS library that does ray-casting. In fact a quick search revealed that threejs does have a ray-caster which might make more sense if you wanna do it on screen.
Now there might be better approaches I’m not familiar with but you could set a 3D lattice of cells and cast a ray from the center of each cell calculating the minimum thickness. Given that’s it’s STL it shouldn’t be too hard to do. Just make sure to define a dense enough lattice so as not to miss any fine features.
LikeLike
Thanks for your help. Much appreciated. I will give an update as soon as I have it sorted.
LikeLike
Hello sir,
I am trying to run this tutorial in Ipython notebook and every time I try run to run it kernel dies and restarts automatically. The problem seems to be in the function vtk_show(). At command renderWindow.Render() the dies. Any idea what seems to be the problem here?
Thanks
LikeLike
Hey Arslan, that sounds like a weird installation issue. Can you verify that you’re using Python 2.7 with VTK 5? I’ve heard from others that they could get my code working on Python 3 but I haven’t tried it myself.
LikeLike
I have Python 3.6.5
VTK version is 9.0.0.
I check it using:
from __future__ import print_function
import vtk
print(vtk.vtkVersion.GetVTKSourceVersion())
When i run the vtk_show(), at line renderWindow.Render(), the kernel dies and restart automatically.
Why the kernel dies?
LikeLike
Yeah you’re using really new versions of both python and VTK. I’ve no idea if any of the code in this blog would work with these versions. This code was written on Python2.7 and VTK 5.
LikeLike
For those wishing to run this tutorial notebook in Jupyter 4.4.0 with Anaconda Python 3.6.7 and vtk 8.1.1, the “data = str(buffer(writer.GetResult()))” statement in vtk_show() needs to be changed to “data = memoryview(writer.GetResult()).tobytes()”
LikeLike
Thanks a lot Gary!
LikeLike
Hello Sir,
I am trying to convert the Dicom file (ct scan inmage) into 3d model (.stl file). I am Using the vtk and visual c++ . To read the file I use vtkDICOMIMageReader and connect with the vtkMarchingCubes . After that I interact vtkmarchingcubes with vtkPolyDataConnectivityfilter .
This filter connect with the vtkSTLWriter file.
But in the directory no file are write here(.stl). So Please help me how it possible so that I can write the .stl file and load it.
Thanks
LikeLike
Hey Amit! It’s really hard wo seeing the code and especially in C++ where VTK errors may be swallowed up at runtime. Can you try the same dataset in a Jupyter notebook to see if the process succeeds?
LikeLike
Hello Sir,
When I am running the command
reader.update()
the kernel is dying every time.
The following are the code
reader=vtk.vtkPNGReader()
reader.SetFileNames(filePath)
reader.SetDataSpacing(1,1,1)
reader.Update()
I am using python 3.6
LikeLike